This brief article shows the basics of how to change your firewall settings for Fedora, Mandrake, and SuSe to allow httpd connections by other networked systems.
The examples given assume that you are setting up a simple intranet server. For a more complex setup where the Linux server handles both internal and external requests, please look at our business firewall article. For instance never allow Telnet connections for an Internet server. Instead only allow SSH.
BASIC Fedora Firewall Configuration
Without a doubt, this is an easy process using the Fedora security tool. From the Fedora main menu, choose System Settings, then Security Level.
Or, if you prefer, just type the following command into a terminal:
system-config-securitylevel
Notice that by default no WWW (http) access is permitted to your server. Select the services you want to allow on your server and press OK.
The screen shot below shows the usual settings for an intranet or internal server where no major security threats exist.

Allowing direct telnet and FTP requests may not be a wise choice if your server also connects to the internet. In such an instance granting only WWW and SSH would be reasonably sufficient and secure.
Once the changes have been save, reboot the server to be absolutely certain that the new settings are configured properly.
BASIC Mandrake Firewall Configuration
Begin by accessing the Mandrake Control Center. From your main menu, select System, then Configuration, and Configure your computer.
If you prefer, you can also access this by simply typing the following command into the Konsole: drakconf
From the Control Center menu, choose the Security icon.
Next choose the Firewall icon. This will start the Firewall utility. On most Mandrake systems, the firewall is disabled by default.
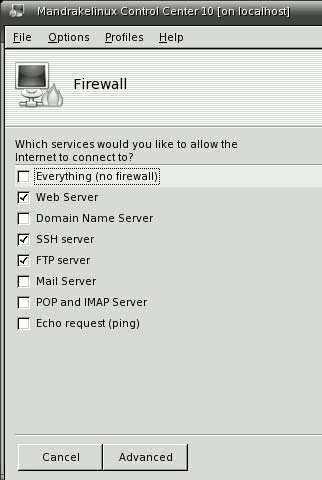
The sample below gives an idea what are the typical services allowed for an intranet server. You would usually only allow web and SSH for an internet server. To make firewall changes, first ensure that the option labeled Everything is unselected.

You will also be allowed to choose which network device is protected by the firewall, such as your DSL modem connection (ppp+) or your network card (eth0).
Finally, you may be asked to install the shorewall package from the CD if you didn’t include it in your initial install. Press OK to let it install.
Now I recommend you do a reboot to ensure all the changes are made.
BASIC SuSe Firewall Configuration
As with almost all configuration, the useful YaST tool also includes a very easy wizard for updating your firewall settings. From the main menu, choose System, then Configuration, then YaST. You can also get to it quickly, so long as you’re logged on as root, by typing the command: yast
From the YaST main menu, choose Security and then Users. You will see an option to the right labeled Firewall. Select Firewall and then choose to reconfigure.

You’re going to see a strange, rather complex message appear. The message is irrelevant because there is only one good reason to modify your personal firewall and that is to reconfiguring it for broader server use, which is what we want to do!
Therefore, simply click Continue and then the Next button, until you arrive at the screen where you can choose the specific services you plan to allow access to your server.

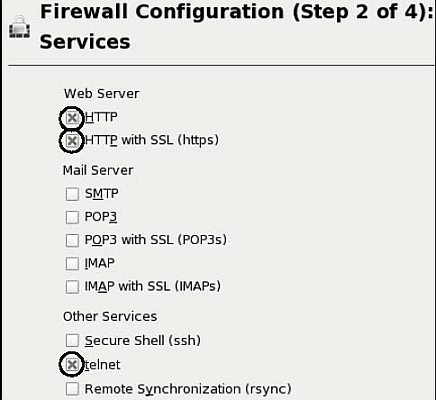
Here, be sure to select the needed services to allow for server use. The obvious ones that most intranet Linux servers require are noted with circles.
Now, click Next and then be sure to unselect the Protect from Internal Network option. This is very important!
This will make your Linux server accessible for intranet server use to other LAN (local area network) PCs. Press the Next button twice and then press the Continue button. Your basic Linux firewall configuration is now complete!