45 Minutes to a Linux Terminal Server
By Mark Rais, senior editor for reallylinux.com
For an introduction to Terminal Servers, first read: In Business the Desktop is Dying
With a Linux Terminal Server and thin-clients, a business can remove many of the costs associated with maintenance, support, and licensing of countless desktop PCs. Thanks to the exceptional efforts of the Linux Terminal Server Project members, such a switch can be both cost effective and efficient.
This article summarizes how one small business made the switch quickly using the extensive effort that resulted in the creation of the K-12LTSP prepackaged release. This ready to use package comes preloaded with every program needed. Most importantly, it can be installed and used within 45 minutes and makes a terrific prototype server. Now any small business can try out the power of a Linux Terminal Server with nominal effort.
If you're ready to begin installing a prototype Terminal Server, please skip ahead to Step 2. Otherwise, read on.
Step 1: What is a Terminal Server and Why Should I Care?
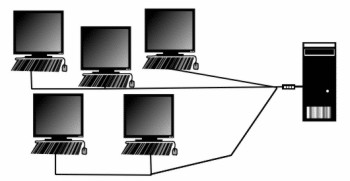
A terminal server is a computer running certain programs that allow other PCs to directly connect and use its resources and applications.
The server is accessed through a variety of thin-clients, which are inexpensive PCs that have a network card connection.

For example, an office may have five desktop PCs attached to the network. By connecting them to a Terminal Server, these PCs no longer need to rely on their own hard disks, memory, CPU power etc. Instead, they connect to the power and capacity of the single server. This one server offers each of the thin-clients (terminals) access to necessary applications, the Internet and Intranet, storage and print devices.
Such a configuration offers the following overt benefits:
The Perceived Barriers
Ironically, most businesses today
already employ a part of this terminal to server model, whether they want to or not.
Most businesses today, especially those operating Microsoft services and servers, rely heavily on central servers to perform tasks such as license and desktop PC management, email and data storage and delivery, and printer sharing. All of these capabilities come from the central servers.
The PC sitting under the desk is nothing more than a place to store licensed applications. Not even individual user data exists on the hard disks. In most companies the data is stored on a SAN (storage area network) and only accessed through the desktop PC.
So the Terminal Server offers a major benefit to existing Microsoft based organizations. It allows you to run applications and maintain those applications and desktops with a single server that requires NO LICENSING BURDENS. Moreover, the constant upgrading cycles no longer apply. You can keep the old PCs around for a decade. They don't need to receive upgrades. Instead all hardware level upgrades occur only on the Terminal Server. In most settings a Linux Terminal Server costing no more than $2,500 can easily support twenty thin-clients.
If you need more clarity how a Linux Terminal Server can help your business, please read my article: Linux in Business. If you desire to use a Terminal Server in an educational environment then please read my article on Linux in the Classroom.
Step 2: Setup Terminal Server Hardware
In the numerous Terminal Server installations I've done, this step usually required less than 45 minutes. In most cases the slowest part of this first step is waiting for the software to install on the server and reading through my text!
Step A: Choose a Server
Obviously, if you have a nice fat
budget, getting a more powerful system will all the more dramatically
increase each individual thin-client session.
However, in a number of cases I installed Linux Terminal Servers for non-profit organizations and applications where there was no budget. This led me to choose the following high reliability, low cost setup.
One of my frequently used configurations is as follows:
It's obviously not a high end server configuration. This is a prototype server I've used countless times because all of the hardware is fully compatible with Fedora Linux and the total cost of this server is less than $500.
If your budget can handle more, then by all means you'll see even further performance gains. However, this particular server can support a handful of thin-clients without any fuss. Eight simultaneous users doing basic things like writing documents with OpenOffice.org Writer get reasonable performance through this setup.
As a rule of thumb, the Linux Terminal Server
(TS) should have:
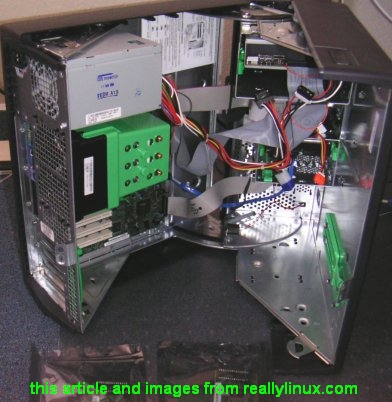
Once you have your server, what ever the brand you prefer, you're ready to move on to the next step.
Step B: Install the Network Cards
It's true, most every server on the market comes
with pre-installed network cards. I caution you that the most
important thing is to ensure the network cards are fully supported by
your Linux flavor. It's also a bonus to find cards that are highly
reliable and inexpensive.
In my case it was cheapest, guaranteed compatibility with Fedora Linux, and easiest for me to use two Linksys Etherfast 10/100 PCI cards purchased seperately. I like these cards and have installed many of them. They sell for less than $20 in most stores and provide excellent network connectivity. You can choose whatever you want, just make sure the cards are fully supported by Linux and that they are reliable.
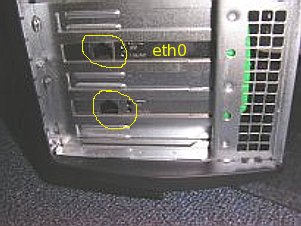
For a proper installation you need two network cards. The first card is the “external” card that handles all data being passed to the internet router/gateway. In my case the first ethernet card (eth0) will support the DSL broadband connectivity for the TS. The second card (eth1) handles the “internal” network connectivity to the thin-clients.
Step 3: Install Linux Terminal Server Software
As with many aspects of Linux, you will find there are a variety of options for installing your terminal server. You may choose and install your favorite Linux flavor and then install the LTSP programs, or you can use a pre-configured LTSP installation.
Ofcourse, no one should simply grab Linux CDs and start installing and integrating within a business setting. I always recommend integration begin with a prototype server on a business subnet. You can read more regarding integrating Linux in any business in my article: Moving to Linux.
I decided to use the K-12LTSP CD set since it is easily installed and comes with everything I need for a small business setting.
Notice, the K-12 version is actually the packaged release used for schools. There are a lot of pre-installed software tools and teaching aids you can simply delete later. It uses the Fedora Core 4 base. For more information about LTSP updates please visit the LTSP.org site.
For a super easy to install prototype, the K12LTSP package is exemplary. This ready made package comes preloaded and preconfigured with so many software needed in a small business setting including:
Start the Installation
Start the installation process by
choosing the Linux Terminal Server from the K-12LTSP installation menu.
I recommend you do an automatic installation and partioning rather than use disk druid.
As the installation proceeds, you will be asked to confirm NETWORK DEVICES.
This is a very vital step. Select the devices you will be using. In my case the eth0 will be connected to broadband and needs to be setup to receive it's IP address via DHCP. The second device needs to be setup to support the TS and should be given some default IP address. If you want to know, the LSTP usually sets the server as: 192.168.0.254
You can include this now if you wish, or do it later in the configuration.
You will be given the opportunity to select packages. I strongly recommend you make sure that at least these packages are included:
Be sure to check all three boxes under System to include: Administrative Tools, System Tools, and Printing Support.
It is useful also to check under Server: Server Configuration Tools, Web Server, Mail Server (unless you plan to utilize an existing Exchange server), and Windows File Server.
As the installation process completes, you can also choose to Install from the Additional CD. Once done, you're ready to run your first Linux Terminal Server sessions!
Step 4. Activate Your Network Connectivity
Once your TS is up and running, you should ensure that the network cards are properly running.
From the main menu, choose System Settings, then Network. If you've never setup a network card for Fedora you may benefit by first reading Post Installation Configuration. For now, highlight the ethernet card that will be used for internal network connectivity to the thin-clients.
Make sure it has the correct configuration. Press the Edit button.
You should ensure the proper IP address (usually 192.168.0.254), and your Subnet mask (often 255.255.255.0 on most networks) and your Gateway (just use a dummy like 123.123.123.1 if you don't know for now) is included. You MUST obviously adjust these depending on your business network. Also note the very important first box that should be checked: Activate device when computer starts.
Once you press OK, you will return to the Network Configuration window. From here choose the DNS tab and be sure to fill in all the necessary data.
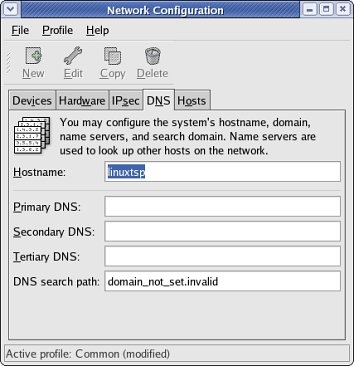
Please make sure you assign a hostname. I've assigned this system the hostname: linuxtsp. You do not have to include any DNS information if it does not apply to your situation.
Now press the Hosts tab.
Here you will see 256 IP addresses listed. All you need to understand at this point is that your TS is listed as the last entry usually ending with .254. The top entry alias "ws001" is the name that will get assigned to the first terminal thin-client that connects to your server. The second alias "ws002" will get assigned to the second one, and so on.
Press the Device tab again and highlight the ethernet card you will use for internal network connectivity again. Now press the Activate button to ensure it is activated.
You should see a little window appear and then disappear.
You're now ready to connect thin-clients to the server!
If you had any issues or need more details regarding network card setup in Fedora, please read this.
Step 5. Create User Accounts on the TS
From the main menu, choose System Settings, then Users and Groups.
Press the Add User button to begin adding new users for the server. Remember that these are users that will login to the server from their thin-clients. Access restrictions and proper user password and security procedures should be applied for this step.
Once you've created at least a test user account for yourself, choose File then quit.
Step 6. Connect a Thin-Client to the TS
Now you're ready to connect a terminal to the server. Choose any PC that is within your network subnet.
Reboot the PC and enter the BIOS setup. With some PCs this requires you to press the F2 key before Windows or another OS loads up. In some other systems and laptops it is the F12 key that allows you to choose boot device.
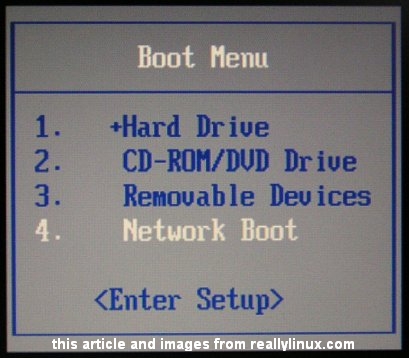
You simply need to get access to the PC prior to it loading an OS and select a Network boot rather than a hard disk boot. Sometimes you need to also designate the Protocol, which should be PXE.
Now allow the PC to boot from the Network. If all works correctly, within a few seconds you should see the PC begin initializing a Linux virtual desktop and then the Fedora login screen. Now log in using your test account name and password.
You are now in and using the TS as a thin-client. That's all there is to it... Enjoy!
Appendix A. Connecting to the Internet
As you recall, we installed two network cards. One was exclusively to be used for all internal networking and the second for external networking.
You may connect a DSL or other broadband connection to the second ethernet device. However, before you do, please keep in mind several things. Depending on your business situation, you may not have a firewall or other security settings protecting such a connection. It's vital you setup a firewall. Although the K-12LTSP comes with many pre-configured firewall and security settings, it is best to get some more insight prior to connecting to an external Internet source. I recommend you atleast review these two articles:
Setting up a business firewall
Using Linux with DSL
TIP: Never connect any business server to an external Internet source without some form of security model in place.
Appendix B. Getting Access to other Windows PCs from the TS
You can use the very powerful Windows to Linux networking tool called SAMBA to perform file-sharing on an existing network.
The details for how to setup and run SAMBA are included in my article: Integrating Linux in a Windows Network with SAMBA.