Quick Guide to Installing Ubuntu on a Mac OSX PC
by Ben Mackie, for reallylinux.com
In this beginner article, Ben Mackie provides step-by-step instructions
for installing Ubuntu Linux through VirtualBox on an Intel Mac running either
Tiger or Leopard. Hopefully this article will encourage even the most cautious Mac users to enjoy the benefits of a Mac with Linux.
Can Linux co-exist peacefully with Mac OSX? Of course it can, and it's my opinion there are some real advantages to having both available on your Mac system. So, with this beginner article it is my hope that others will be open to trying out the power of Linux on their Mac.
BEFORE YOU
START
A few items you may prefer to have when starting:
• A
blank cd
• A
copy of Ubuntu
• A
copy of VirtualBox 3
• A
copy of Burn if you wish to use it
• An
Intel Mac running Tiger or Leopard
You
might also benefit from a review of the Reallylinux.com article for Ubuntu
beginners: http://www.reallylinux.com/docs/basicubuntu.shtml. It offers some introductory guidance regarding Ubuntu for new users.
GET UBUNTU
To
get Ubuntu, click on the following link:
http://www.ubuntu.com/getubuntu/download
For
this installation I recommend you simply choose the Desktop Edition of Ubuntu.
Start
now by selecting the closest location to you in the dropdown.
Scroll
down and ensure 32bit version is selected.
Select
Begin Download.
Once
finished, locate the downloaded file; it will be named something similar to
ubuntu-9.04-desktop-i386.iso
To
create a bootable disk from the .iso, you may wish to use the useful tool named Burn.
Go to the following link to get this tool, or simply choose a burner of your
preference:
http://burn-osx.sourceforge.net/Pages/English/home.html
No, you do NOT have to use this tool, but it has several advantages and I include it in the process simply as an example of the ISO burning process. The
nice thing about Burn is that you simply download, install, and open. PLUS, often the biggest issue with an install is an improperly burned ISO, and this tool helped me get quick and correct burns each time.
In
Burn, go to the copy tab as shown below:
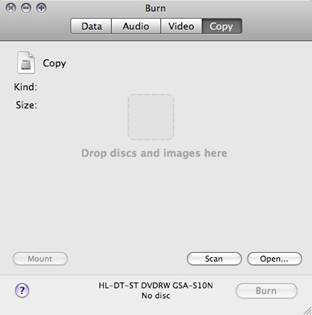
Now
just Drag the .iso file you downloaded to where it says, "Drop discs and images
here."
Insert
a blank cd.
Select
Burn.
Ensure
Maximum possible is selected.
Select
Burn.
Once
complete, this is the Ubuntu Linux boot disk you will need for the next steps.
DOWNLOAD
VIRTUALBOX
Virtual
box is a fantastic and enterprise capable virtualizer for Mac hardware. For
those not familiar with virtualizers, this tool allows you to install Ubuntu in
a shared manner with another Operating System such as MacOS or Windows.
You
may wish to find out more about this SUN Microsystem's tool, as it is very
useful for many virtualizing scenerios. Best of all, it is one of the only
virtualization tools that is also Open Source Software.
To
get VirtualBox simply go to this link:
http://www.virtualbox.org/wiki/Downloads
Under
VirtualBox Binaries, where it says VirtualBox 3.0.0 for OS X hosts, select
"Intel Macs"
Open
the VirtualBox disk image and run the installer
ADVANCED TIP: If you're a more advanced user,
it's important to let you know that rather than burning the ISO to CDROM, then
using the CD to install into Virtualbox, the CDROM drive in virtual box can be configured to point at the
ISO file, eliminating the need to burn a disk.
START THE INSTALLATION
When
you're ready, open VirtualBox from the Applications folder on your Mac.
Begin
the following series of steps:
Register
(optional)
Select
the "New" icon in the toolbar.

A
new window will open.
Select
Next.
Enter
a Name for the virtual machine e.g. Ubuntu Linux.
Change
Operating System to Linux.
Change
Version to Ubuntu.
Obviously
you can apply this method to other Linux flavours if you wish.
Select
Next.
Select
amount of RAM to be used on the virtual machine.
(384
recommended, I recommend 512 if you have 1GB RAM on your Mac).
Select
Next.
Ensure
Boot Hard Disk (Primary Master) is selected.
Select
"Create new hard disk."
Now
you need to again Select Next and once more Select Next.
Choose
"Dynamically expanding storage" ("Fixed-size storage" creates a fixed hard
drive for Ubuntu, but "Dynamically expanding storage" only uses as much hard
drive space as it needs to install and will thereafter expand as needed).
Select
Next.
The
Name you chose for the Virtual Machine earlier should now show under Location;
if not then enter the same name as before under Location e.g. Ubuntu Linux, and
select the amount of maximum space that the hard drive can use.
TIP: This will automatically be something like 8 GB but you can
change it depending on your requirements. Or just leave it as it is and move
on.
Select
Next.
Now
Select Finish.
Finally
Select Finish once more.
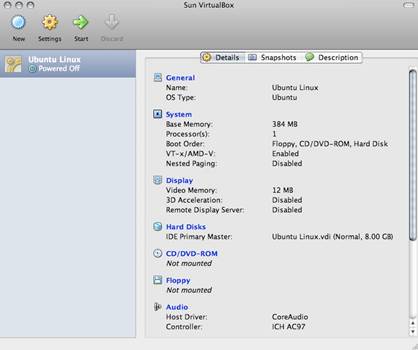
You
should now see something similar to this:
When
you're ready, please press the "Start" icon at the top.
Now
start this process:
Select
OK.
Select
Next.
Ensure
CD/DVD-ROM Device and Host Drive are selected (should be the default).
Select
Next.
Insert
previously created Ubuntu Linux bootable disk.
Select
Finish.
At
this point the disk will start booting.
Select
English or your preferred language.
If
a screen appears regarding the mouse or keyboard, take note of the host key;
something like the Left Command key (also shown at the bottom right of
the VirtualBox window). This is important so please don't forget what it indicates.
Now
select the checkbox "Don't show this message again" and select Capture (This
will make the mouse change automatically when you select the virtual system.)
Select
Install Ubuntu.
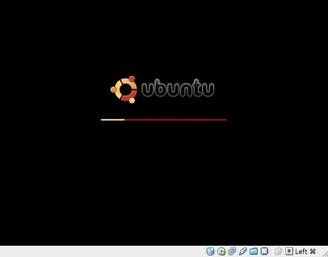
At
this point you should get the following loading screen, which is Ubuntu
starting:
INITIAL UBUNTU
SETUP
Once
finished loading (this may take a few minutes), ensure your language is
selected once again on the left panel and select Forward.
Select
your Time Zone on the map or by your region and city.
Select
Forward.
Choose
keyboard layout depending on the type of keyboard you have (to test, simply
type digits into the typing box, ensuring that it enters the correct digits as
on your keyboard).
Select
Forward.
Choose
"Use the entire disk."
Select
Forward.
Fill
in your name, account username, password (minimum eight digits recommended),
and computer name for network visibility.
Choose
whether to log in automatically or require a password to log in.
(I
recommend that you do require a password, just take note of what you choose).
Select
Forward.
Now,
please Select Install.
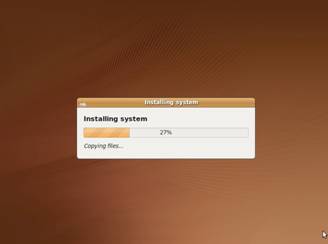
It
should show the following installing system box with a status on the
installation.
Be
patient, as this is nearly the final step, but unfortunately takes time. It
can take anywhere from 10 minutes to an hour to install, depending on your
system. Look at it this way, now is a perfect time to grab a tasty snack, sit
back and enjoy an episode of your favourite TV show.
You
can check on the status of the installation, as shown below:
When
completed, please Select Restart Now (you should not restart the Mac itself,
the VirtualBox will merely restart Ubuntu for you within the program).
It
will say on the Ubuntu restart "Please remove the disc, close the tray (if any)
and press ENTER to continue"; when this happens, the eject button in OS X will
not work therefore in the VirtualBox window, select Devices (on the top toolbar
in OS X).

Select
Unmount CD/DVD-ROM and press ENTER.
Now
you will be able to eject the disk from the computer.
Enter
your Username and Password (the one you should have noted earlier!).
TIP: If you need more details with regard to Users and user
privileges in Ubuntu, you may wish to review this article: http://www.reallylinux.com/docs/usersubuntu.shtml
Ubuntu
will open and the Update Manager should automatically open (if not, it can be
found in System/Administration).
Select
Install Updates (this may take a while depending on your internet speed).
OUTSTANDING!You should now have a virtual machine Ubuntu running
inside OS X.
(Optional
to increase graphics performance)
Whilst
in Ubuntu,
Select
Devices at the top of the screen again
Select
Install Guest Additions
This
will open on your Ubuntu desktop as something similar to
VBOXADDITIONS_3.0.0_49315
Double
click it to open
Double
click autorun.sh
Select
Run
Enter
your password
It
will open a terminal window and may take a couple of minutes to complete
Once
finished, it will say, "Successfully installed the VirtualBox Guest Additions."
Press
ENTER
Restart
Ubuntu
Go
to System/Preferences/Display to customize the screen size.
CONGRATUALTIONS and I give you a hearty welcome to Linux!
For
further help with Linux, look over the list of the other articles here on the reallylinux.com website,
as there are plenty more beginner articles to get you started.
TROUBLESHOOTING
The
process is fairly straightforward, but in case you encounter an issue, I try to
provide some tips for the more common anomalies.
If
you get this message,
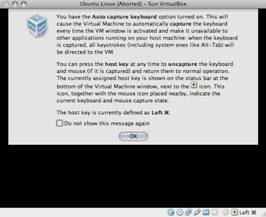
Select
"Do not show this message again" and select OK
To
change the mouse back and forth simply click the Linux window to use Linux. To
change back to Mac OS X, press the host key once (as indicated at the bottom
right of the Linux window)
If
you get a black screen on the Linux window, simply double click to restore
session.
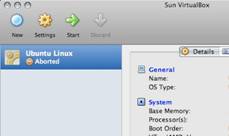
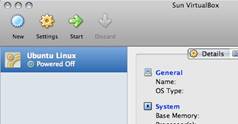
Note:
to close VirtualBox, in the open Ubuntu window, select your name on the menubar
and select shutdown; when it says Aborted or Powered Off under your Ubuntu
Linux boot in the VirtualBox program, it is safe to close VirtualBox. To run in
the future, simply open VirtualBox, select your operating system e.g. Ubuntu Linux
and select Start
or
 ]
]
If
the installation fails for some reason or another, select the operating
system name, while in VirtualBox, and then select Discard. Unfortunately, if a
complete fail occurs, you will need to restart the installation process. Make sure your ISO burn is correct.
You may also wish to review the article Exploring Linux with Ubuntu.
This brief article is intended as a beginners guide to help new Linux users get started using Ubuntu on their Mac running OSX.
All trademarks or registered trademarks in this article belong to their respective owners.