 Installing
Linux Basics
Installing
Linux Basics
by Mark Rais, author of the beginner Linux book Linux for the Rest of Us. Many more tips are available on our "Help page.
The tips and information refer primarily to Fedora/Redhat® Linux, but can be useful for all installations. Please always think before you do, especially since any installation will wipe out all data on the partition you are installing.
Also
remember, you may benefit from our many Beginner Linux Articles.
Before You Begin
The following sections include the usual steps that will
appear as your Linux installation progresses:
Starting
the Installation
If youre not excited yet, youll soon be as you slip
your Linux CD-ROM into the drive and let the installation program start!
Sticking your Linux CD into the drive and rebooting your system should automatically start the installation.
If it does not, then you may need to change your systems BIOS settings to allow the CD-ROM drive to be the first drive to boot from. This is usually done by pressing the Delete key or F2 key when the system starts.
In some instances, you may instead need to create a boot disk to begin the installation.
Once the system boots from the Linux CD and the installation
program begins, you can start using the steps on the following pages.
Basic
Installation Setup
Almost all of the newer flavors of Linux begin with a
very basic installation setup that allows you to choose your language,
keyboard, and mouse settings. This is only for installation and wont
affect your final setup.
Choose
Custom Installation
Remember that all flavors of Linux are slightly different,
but the essential steps are the same. In almost all cases you begin
by having to choose from workstation, server, or custom. The latest
Red Hat versions also include Personal Desktop, which is very basic
and leaves out useful tools.
I choose Custom all of the time, no matter
who I'm installing for or what the purpose is, since it gives me the most
control and flexibility.
Partitioning
Most flavors of Linux, including Mandrake, Red Hat, and
Slackware, will give you the option of automatically partitioning
or allowing you to custom partition.
If you dont plan to do anything fancy with your server, then you can go ahead and choose Automatic partitioning (often called Basic). Using a newer version of Linux, the result will be a very simple partitioning of your hard disk into three sections. This is fine for basic work or beginner use. I prefer something different personally.
I strongly prefer to use Disk Druid tool (often called Expert) to enhance my partitions and to give me more flexibility. It may sound intimidating, but using this tool ends up giving me a lot more control over what happens to my installation.
I rarely use fdisk, although with some flavors
it is the only option. When I do use fdisk, its only for
cases that require complicated partitions.
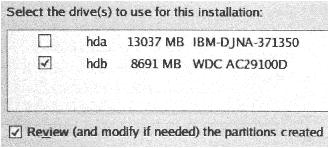
If you choose Automatic (Basic) partitioning you will likely see:
It is absolutely critical that you ONLY select the hard disk/s that you want Linux running on! Otherwise, you will lose all data on all drives! In this example Ive unselected my Windows hard drive (hda). Once youve chosen which drive to automatically partition, please skip ahead to "Boot Loader Configuration" further below.
However, if you prefer to choose the Disk Druid tool (sometimes
called Expert), please keep reading for details on partitioning.
For me to write even some of the variations for dual boot machines would end up well beyond the scope of this basic book! I have to be open and tell you I can not recommend sharing the same hard drive between multiple Operating Systems, especially when new hard disks are so cheap. Youll also find that some operating systems make it very difficult to have a dual boot with Linux.
However, there are some options
for sharing Linux and another OS:
1. Run Linux under
another OS like MS Windows. This is not at all recommended since
you will lose many of the benefits of Linux.
2. Erase all of the
current partitions and make new ones to handle both Operating Systems.
For instance you would create a vfat partition for Windows, and several
ext3 partitions for Linux. This takes a lot of time, and requires
a full reinstall. But it offers you a way to share one hard drive
with several Operating Systems.
3. Purchase a second
hard drive and install it into your system as the Linux hard drive.
You can still choose which OS to load, but they are safely on separate
hard drives in their own partitioning schemes.
NOTE that some versions
of Windows have issues when placed on the 2nd drive.
You may need to place Windows on the primary drive.
Using
Disk Druid to Add Partitions
To add partitions (aka: Mount points) be certain the
hard drive that is selected is really and truly the one you want Linux
partitions on! All data on the selected partition will be deleted.
(If youre installing Linux on a non-dual boot machine, this isnt an issue
for you.)
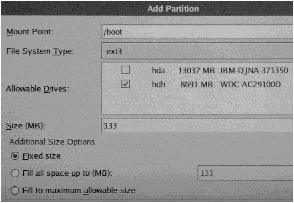
In this example, I press the New key (Add on some versions) to begin creating new mount points/partitions using Disk Druid.
If you are replacing an OS with Linux, then you may first need to Delete existing partitions of the hard drive.
Once you press New or Add to begin making mount points,
you will see another window appear, usually labeled Add Partition.
You may now begin adding the partitions you need for your server.
TIP: For dual-boot
systems with more than one hard drive, please be certain that for each
of the next few steps the Allowable Drive selected is only the one you
want for deleting and creating Linux partitions on! You must do this
each time you add a new partition mount point!
A. Create Mount Point: /boot
Create Mount Point /boot which will be the area where
Linux kernel and startup information is kept. I usually allocate
several hundred MB at most to this. For this installation I assigned
133MB.
B. Create mount point: /
Create the Mount Point / that will be the area where
root files and most programs are kept. I usually recommend at least
having 2GB in this area.
C. Create mount point: <Linux Swap>
Create the Mount Point <Linux Swap> by going to the
Partition Type, also called File System Type, and choosing Swap.
Scroll down until you see Swap and select it. The Mount Point field will
automatically fill in for you in most versions. The swap partition
is a partition used to store temporary system data.
I usually make the swap file smaller than my total system RAM or the system will end up swapping more than storing in memory! For instance my server has 512 MB of RAM, and I create a Swap of 256 MB.
If you do this, on some of the newer versions of Red Hat and Mandrake youll get a strange error complaining that the Swap file is too small. You can just ignore this message as long as you have made your swap size larger than 100 MB.
D. Create Mount Point: /usr
Create Mount Point /usr which is the area where user
related programs and files go. Be sure to select the option for Use
Remaining Space. In some flavors this option is called Fill to maximum
allowable size.
This will correct the Actual size so that the remainder
of your hard drive space is given to /usr. You should have at least
4GB of total disk space available to install everything from your Linux
CD!
TIPS: You can also add the /home mount point to ensure there is a unique mount point for individual users.
This is very helpful if you
expect a lot of users on this server and intend to add additional disk
drive space for them in the future.
Choosing
Partitions to Format
Some of the newest versions of Linux do not show
this step.
On some versions of Linux, you will see a listing of the mount points just created and their exact path name, including the specification of which hard disk they will be placed on. Remember hda is the master hard disk of your system. Dont allow formatting of this drive unless you are certain it is the one you want Linux placed on.
Theres no need to check for Bad Blocks (an optional check
box) unless you suspect your hard disk has errors.
Boot
Loader Configuration
Use LiLo or GRUB as your default boot loader.
If LiLo is not the default for your Linux flavor you can select it by choosing to Change the Boot Loader. In some instances, a newer boot loader named GRUB is set as default. Its totally a matter of choice. I prefer to stick with LiLo since Ive used it without issue for the last eight years. However, others prefer GRUB. Just make sure you choose a boot loader!
The boot loader must be placed on your first or master hard disk to work properly (hda).
If you are given the option of putting LiLo on the MBR
(master boot record) OR on the First Sector, choose First Sector if you plan
on using a dual boot server with WindowsXP, Windows NT or Windows2000. For WinME you must use MBR.
Network
Setup
Unselect the DHCP option and be sure to set a host name
manually.
I usually set up stand-alone Linux servers, such as intra-office
web servers. So in almost no case do I use DHCP (Dynamic Host Configuration
Protocol). You can certainly use DHCP if you want another server
to establish this system's network IP, but frankly this seems rather silly
to me.
Hostname is usually a simple name such as: myserver
For some Linux versions, usually the simplified releases, the installation does not include steps to go through the details of network host and IP installation. In any case, I recommend that you add this information manually. You can always add or change network configurations later by typing at the Linux command prompt: netconfig
Manually insert the system's IP address and host name. You can do this in some Linux flavors by pressing the Edit button next to your Network Device name. Then unselect the DHCP option!
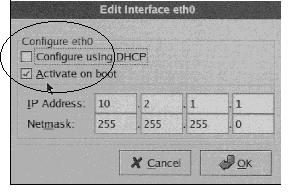
Let me give my own server IPs as an example. I'm running my server behind a firewall and simply need to designate this servers host name as myserver and IP as 10.2.1.1.
Just type in your machines IP and netmask into the available fields.
Some releases of Mandrake, Red Hat, and Slackware, once you designate the IP, will automatically fill in fields like Netmask and Gateway. If your Linux fills in Netmask for you, please be sure you really should be using the default setting of 255.0.0.0! Most networks require 255.255.255.0.
The fields that will not be filled in are your DNS server IPs. You need to get them off another machine in your local network area or simply ignore them for now if you dont have a domain name server.
TIPS: In many cases
the easiest way to figure out what all these numbers should be in a business
setting is to check a PC nearby. To find out about your particular
networks IP information you may try these:
If you have other Linux
servers already in your LAN then use the command: netstat
If you have Windows systems
in your LAN use the command: winipcfg
Firewall
Settings
Just leave your firewall settings on Medium if you have
no idea what to do! This should be fine for running something like
a simple Linux intranet web server. At the same time, you need to
consider the security risk of your particular system. If its going
to connect directly to the Internet the risk goes up substantially.
TIP: I am installing
a server within the corporate firewall and although security is always
important, I have the ability to simplify my life by customizing the Medium
secure firewall by doing the following:
Selecting ETH0 (my servers
ethernet card) as a trusted device
Selecting the TCP, FTP,
SSH, and Telnet options to allow incoming access from these connections
and applicable ports. This is NOT a good idea if your server is going to
be connected to the internet!
Picking
Language and Time zone
Just choose a language and move on!
TIP: Leave the language setting on default and move on to the next step! I had a colleague who thought it would be funny to try out a new and unique language for his Linux server. He chose something that basically made his server totally unreadable to him and required a complete reinstallation. I guess the joke was on him!
Time zones: Its important to choose the right
time zone, since otherwise your users will be negatively affected.
Users dont think it so funny if their files and all of their program date
stamps are wrong by several hours! Its also important to set the
server time correctly since there are many CRON or other time sensitive
jobs
that need accurate time settings!
Creating
Root and New User
I cant stress enough to make the root password something
simple to remember and yet hard to crack. More times than I prefer
to count, Ive had friends phone me late at night asking if I could help
them recall the root password they created during our installation!
Full access login on any Linux server is root by default.
Also, take time to add an additional login account to
your server. You may do this by pressing the Add button or the new
user option.
Take time to create an additional user account for yourself.
I always have a secondary login for my servers since I can do some things
under root that are very dangerous! I usually create one other account
for myself and continue on with the installation.
Password
Protection
I always use MD5 passwords and Shadow Passwords.
I rarely enable NIS, LDAP, or Kerberos. On the latest
Red Hat and Mandrake releases, SMB is also an option. In some corporate
situations where Kerberos IDs are standard I must include this. However,
for a simple Linux server none of these are necessary.
Package
Installation
Now when it comes time to select which Linux applications
you want to install, there is a vast array of options! Many times,
simply installing everything will work just fine! Do so if you have
time and disk space!
What you personally decide to do is a matter of choice, but should be tempered with the fact that installing everything doesnt make life easier, but installing too few things will definitely make life harder!
I strongly recommend you install both KDE and GNOME interfaces which come with their own distinct applications. These are two of the popular X-Windows Desktop interfaces.
It is well worth installing these two interface managers, even if you only plan on using one, since the installation will add lots of extra applications and goodies for you.
The choices are yours to make and I recommend you take time to read through the basic listing. If you plan to install everything, be sure you have allowed at least 4GB of space. By leaving off a number of the developers tools like Kernel Development and some Servers I never use like DHCP and News servers, the installation takes around 2GB.
Also, since its been a point of confusion to many, you dont need to install the Windows File Server to just do basic file sharing between your Linux machine. This server actually loads SAMBA and other tools.
Please note that some of the tools I refer to in this
book are going to be installed only if you select the right packages or
install everything.
Creating
an Emergency Boot Disk
Some of the older versions of Linux include this step
right after Choosing Partitions to Format. Others simply include
this at the very end.
Now, is this a good idea? Well, yes! In fact, not creating a boot disk and simply skipping the option is as silly as throwing rocks at a hornet nest. You may get away with it for a while, but it'll sting you eventually!
You can create a boot disk after installation too, but
it is not as easy. If you have already installed Linux but need a
boot disk, then please look at our article: Creating
a Boot Disk. Otherwise, go ahead and let the installation make
a boot disk for you.
Congratulations and well done!
This takes care of most of the installation steps!
Shortly, youll have a Linux server of your very own installed and ready
to run!
Need More Information or Help???