45 Minutes to a Moodle Education Server
An Unofficial Beginner Guide to Moodle
by Mark Rais, senior editor reallylinux.com
Read more of our 45 Minute Linux Series:
45 Minutes to a Terminal Server
This beginner article by Mark Rais provides step-by-step instructions for installing Moodle, a Learning Management System, on to a Fedora Linux server. It provides everything necessary to setup a full powered intranet web-server that can support course listings, event calendars, student/teacher communication and much more. Best of all, a prototype server can be functional within about 45 minutes.
For those unfamiliar with Moodle, let me briefly share why this tool now supercedes nearly all other learning management systems. The Moodle project, started by Martin Dougiamas in 1999, has delivered a most capable and feature rich tool for schools and educators. Moodle, also termed a Course Management System, is a web content tool currently used in over 150 countries.
The design and automated functions make installation and support almost too easy. Since Moodle is a purely Open Source development project, licensed under the GPL, it is freely available for all organizations. More importantly, with a world-wide community and use in 70 languages, support and guidance are also readily available.
Before you begin, I strongly encourage you to review the excellent documentation on the Moodle.org website. I especially recommend the official basic installation guide. This article is most effective when used in conjunction with the official guides and documentation. I also recommend that you consider combining the power of Moodle with a Linux Terminal Server. By doing so, you can create entire learning labs within hours using old, used computers and with nearly zero capital expenditures.
Now let's get started installing and running Moodle on Fedora:
Step 1. Assumptions and Needs
I assume that for the following steps you will be using either your root or a superuser account with the necessary access privileges. Although I try as much as possible to include only GUI tools, there may be an occasional need for you to use a command.
Although it is relatively easy, this guide does not explain how to setup your Fedora server network connectivity. I assume your server already has such connectivity working.
Finally, before you begin, please ensure that your system is atleast Fedora Core 4, comes with MySQL database, PHP version 4.1 or higher, and Apache httpd web-server already installed. If you did a full install of Fedora Core 4 or 5, then these items will most likely already be ready for use.
Step 2. Extract the Moodle Installation File
Download and copy the Moodle installation file (.tgz format) to your Fedora system. The latest Moodle file is named something similar to moodle-latest-xx.tgz where xx is replaced by the latest version number. For instance: moodle-latest-15.tgz
The single tgz file you download (around 16MB) is a compressed file that actually contains over 16,000 files and folders (around 58MB). To be able to perform the installation, you must first extract these files.
KDE:
A. From the main menu, choose System Tools, then File Manager - Super User Mode
B. Find the moodle-latest-xx.tgz file and double click on its icon
C. Once you see the Moodle folder, drag-and-drop it on to your Home Folder
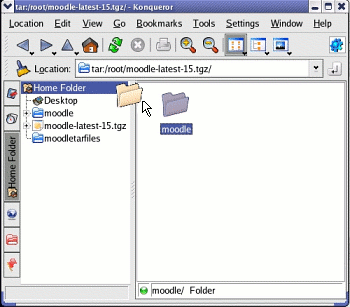
This should automatically copy the Moodle folder into your Home Folder and extract all of the files contained within.
GNOME:
A. From the menu, choose Places and then Home Folder or the folder you copied your moodle-latest-xx.tgz into
B. Once you locate the moodle-latest-xx.tgz file, double click on it to start the Archive Manager
C. From the Archive Manager window, choose the Moodle folder and press the Extract button
D. This opens the Extract tool options. Be sure to choose the Re-create folder check box and press Extract
Note which folder the files will be extracted to! Usually the default is Desktop.
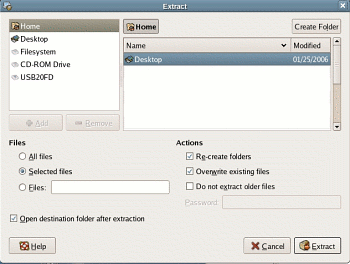
If you run into an issue, you may also try the following manual extraction option.
MANUAL EXTRACTION:
A. From either Gnome or KDE choose the Terminal or Console (usually under System Tools)
B. Create a directory for the files to extract into such as moodleextract
mkdir moodleextract
C. Copy your moodle-latest-xx.tgz file into the new directory
mv moodle-latest-15.tgz moodleextract
D. Now go to the new directory and uncompress all of the files
cd moodleextract

tar -xvzf moodle-latest-15.tgz
You should see a massive number of files scroll by and then see a new folder under your moodleextract directory called moodle.
Step 3. Copy Moodle Web-server Files
Now that you have extracted every file related to Moodle, it's time to move the files to the proper location for your web-server.
As noted in the excellent installation instruction guide, Moodle can be placed directly into your web-server's primary html folder so that Moodle is the only web content presented, or it can be included in a sub-folder where Moodle can co-exist with your other intranet web-server content.
In most cases, allowing Moodle to become your principle content management system is both beneficial and easiest. In such an instance you would then copy the moodle folder, we just extracted in the previous steps, directly into this folder:
/var/www
If you already have a website or need to divide content you can also place the folder under: /var/www/html
Let's assume you will be using Moodle as your core content management system on this web-server.
KDE:
A. From the main menu, choose System Tools, then File Manager - Super User Mode
B. Find the moodle folder in your file browser and click on it twice
C. You should see about 31 folders & files. Now choose Edit, then Selection, then Select All
D. Once all of the files/folders are highlighted, choose Edit then Cut
E. Now push the up arrow  on the File Browser two times and look for the folder labeled var
F. Double click on the var folder, then double click on www, finally double click on html
G. Now choose from the menu Edit, then Paste
GNOME:
A. From the main menu, choose System Tools, then File Browser
B. Find the moodle folder in your file browser and click on it twice
C. You should see about 31 folders/files. Now choose Edit, then Select All
D. Once all of the files/folders are highlighted, choose Edit then Cut
E. Now push the up arrow  on the File Browser two times and look for the folder labeled var
F. Double click on the var folder, then double click on www, finally double click on html
G. Now choose from the menu Edit, then Paste
Don't close your File Browser yet! Now over 16,000 files will now be copied to your web-server content area under /var/www/html.
CHANGE FOLDER PERMISSION
Before you can proceed with the rest of the installation, it's important to change the permissions for your web folder /html to allow Moodle Installation to create some essential files. Remember, that later you need to return to these steps to change the permission back to the more secure setting.
KDE:
A. From the File Browser window you just used, push the up arrow so you can view your html folder.
B. Right click on the html folder and choose Properties from the mini-menu.
C. Click on the Permissions tab
D. Now click on the Advanced Permissions button and ensure your settings look like this:
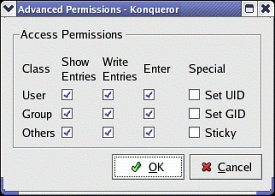
GNOME:
A. From the File Browser window you just used, push the up arrow so you can view your html folder.
B. Right click on the html folder and choose Properties from the mini-menu.
C. Click on the Permissions tab
D. Now ensure your settings look like this, then press close:

MANUALLY CHANGE PERMISSIONS
Some people prefer speed to nice interfaces. For you the following commands will perform the same function. Remember that later, when the install is complete, you need to return to this same step but change the permissions to 755 instead of 777.
From the Terminal prompt type:
cd /var/www

chmod 777 html
Step 4. Ensure that Web-server and MySQL Are Running
Before going to the configuration step, it's time to ensure that your system is properly running the Apache httpd and MySQL tools.
You can ensure these are operational and active using the GUI tools.
KDE:
A. From the main menu, choose System Settings and then Server Settings
B. You should see the icon labeled Services. Click on it once. This will open the Server Configuration window.
C. Scroll down until you see the following and be sure to check the box beside each: httpd, iptables, mysqld
GNOME:
A. From the main menu, choose Desktop, then System Settings and then Server Settings
B. You should see the icon labeled Services. Click on it once. This will open the Server Configuration window.
C. Scroll down until you see the following and be sure to check the box beside each: httpd, iptables, mysqld
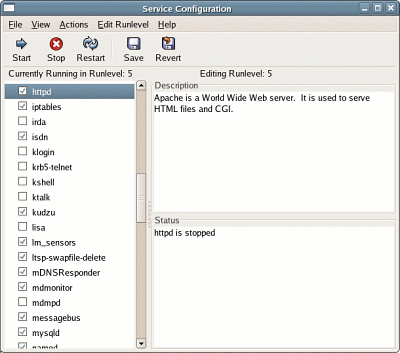
D. Now press the Save button. Now scroll down and choose each one (httpd, mysqld etc) and press the Start button after highlighting each.
You can now test to see whether the web-server daemon (httpd) is operating properly by trying out a browser. In your browser (firefox, mozilla, opera etc) type this url:
http://192.168.0.254
Obviously, REPLACE the IP address above with your REAL IP address from your server. If you have a properly configured hostname you can also try the fully qualified name such as: http://test.myschool.org
If your web-server is working, you should instantly be taken to the Moodle Installation screen.
If you do not know your server's IP address, you can always use this command from the terminal or console:
ifconfig
Now try the IP address to ensure it truly is responding.
ping 192.168.0.254
(Replace my example with your IP). If you get a response in milliseconds, all is well. However, if you get Host Unreachable you have some problems with the configuration of your network settings and need to try to correct these first.
SECURITY NOTE
It is wise not to initially connect this server to the Internet. If you plan to eventually connect this server in such a way that it offers external access to the Internet, please ensure that you follow some of the following safety guidelines:
Always run a firewall (learn more about this from excellent documents including this article)
Disable all unnecessary processes such as bluetooth, pcmcia etc. You can do so using the same Server Configuration tool above.
Close all unnecessary ports to your web-server (see this article for more details and ideas)
Learn more about web-server security from great sources including this FreeSoftware Magazine article.
For now, it is best to keep the prototype installation simple until your Moodle site is properly configured. Keep the connectivity to within a firewall on the intranet for now.
Step 5. Configuring Moodle
It's time to start configuring Moodle. Fear not, this process usually takes about ten minutes at most, but is very important for finalizing your website configuration and operation.
A. LANGUAGE
The first installation screen offers a choice of Language. Please choose your language and press the Next button.
B. PHP SETTINGS
The second window shows your PHP settings and indicates if PHP is properly installed.
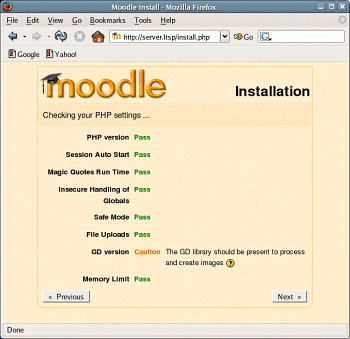
Don't worry about the GD library for now, everything else should say Pass. Now press the Next button again.
C. INSTALLATION DIRECTORIES
You will now see the key installation folders. Notice that although it indicates you need a Data directory, you must create this directory yourself. Let's do this now. From a terminal or console type these commands:
cd /var/www/

mkdir moodledata

chmod 777 moodledata
D. DATABASE CONFIGURATION
Press the Next button and you should now see the Database configuration window. Notice the statement "This database must already have been created..." It's now time to drop back to the terminal or console and create our moodle MySQL database.
Start by creating your primary MySQL database. NOTICE that if you already have a database, this information will overwrite the existing database. These steps are intended only for a NEW database.
TIPS: Please ensure you type a unique root password for your self, replacing rootuserpass. Be careful and take your time when typing these commands! Also note that you must create your own user password to replace moodleuserpassword.
ACCESS THE MYSQL DATABASE
mysql -u root
BEGIN USING THE MYSQL TOOL
These commands will be typed beside the mysql> prompt.
USE mysql;

Database changed

UPDATE user SET Password = PASSWORD('rootuserpass') WHERE User = 'root';

Query OK

FLUSH PRIVILEGES;

Query OK
In the steps above you created a root user account with password for your new mysql database. Now let's keep going and setup the moodle database with a moodle user account. Obviously, please create your own password replacing moodleuserpassword. It may help to cut & paste the commands below.
CREATE DATABASE moodle;

Query OK

USE moodle;

Database changed

GRANT ALL PRIVILEGES ON moodle.* TO 'moodleuser'@'localhost' IDENTIFIED BY 'moodleuserpassword';

Query OK

FLUSH PRIVILEGES;

Query OK

quit
Now restart the mysql administrator tool.
mysqladmin -p reload

rootpassword
Replace rootpassword with your root password and you are finished!
Now return to your web browser, view the Database configuration screen and fill in the blanks based on the new moodle user you created.
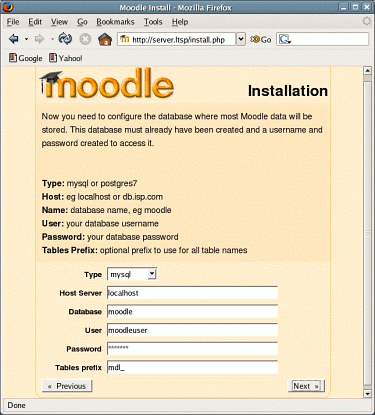
Press the Next button and you should get a very nice success screen.
You're ready to finalize all Moodle configuration files!
STEP 6. Finalize All Moodle Database Tables
The Moodle configuration tool will begin setup of multiple database entries. The next few windows are simply telling you the tables and settings and in almost all cases you should simply need to press the continue button.
Now scroll down and ensure all items are marked with: Success
Scroll down and locate the Continue button all the way at the bottom and press it.
Do this same process again for the Upgrading Database window.
Find the Continue button all the way at the bottom and press it.
Finally, press Continue one more time and you should see another window named: Setup Block Table.
Find the Continue button all the way at the bottom and press it.
You will need to repeat this two times.
Then you will see a new window labeled: Site settings
Step 7. Configure Your Moodle Site
You're finally ready to put the finishing touches for your prototype Moodle site! On the Configuration screen you can make a number of custom selections regarding your website. For now just fill in some basic information. You will be able to return to this page and make future updates any time you wish.
I recommend that you select the Front Page Format option to be News items. Most Moodle sites have a news/updates section that makes up the home page center. You can easily create news items such as announcements, especially useful as you just start your site.
Now press the Save changes button.
You should now see the Administration control window. These options are very important as they dictate how your administrative account will operate. Please use a password that is not easily forgotten but also not easily identified by others.
You may include many other details, although for an administrator account we usually offer as few as possible details.
Be sure to add a New Password, and include a valid email address, the city and country, and then press the Update profile button.
You should now see your prototype Moodle website running!
Now click on the Configuration menu option on the top left menu and you may begin enhancing and customizing your website for your educational organization.
Next Steps
It's a great feeling to see Moodle up and running on your server. However, prior to connecting this server to a wider network, or allowing others to use the Moodle system, you need to address a few open items.
FOLDER PERMISSIONS
Be sure to address some of the overt security issues. In Step 3. you changed permissions for your webserver folder /html and in Step 5. Section C. you changed permissions for /moodledata. Now, using the same steps, go back and change the permissions to reflect a more secure web folder where only you can write or modify the files. The permissions should be set 755 or appear similar to this:

I recommend you change the permissions like this for ALL of your related website folders. Making sure that they are not available for write by anyone other than admin is very important.
STOP UNNECESSARY PROCESSES
You should also return to your Server Settings tool (see Step 4.) and disable all unnecessary processes.
Scroll down the list and identify the overt unneeded processes. On a Moodle server, I usually disable, among others, these items: apmd, apt, bluetooth, cups, dhcpd, isdn, mdmonitor, pcmcia, smb, and winbind. But, be certain iptables (firewall) is enabled!
You can always re-enable any of these in the future. For now, uncheck the services you do not need, press the Save button so the changes are saved for all future bootups. Then I always recommend a full server restart.
ADD USERS & AUTOMATED PROCESSES
Obviously a tool like Moodle is only as useful as it offers access and personalization. It is essential to begin by adding users, either manually or through a text file listing. You can do this through the Administration menu option labeled Users.
If you want Moodle to perform certain functions such as sending automatic emails, you need to ensure that your CRON process is running. CRON allows for automated processes and scripts to run at set times. Learn everything you need about CRON from my article The Basics of CRON and Linux Automation.
CREATE CUSTOM DESIGN
It is also important to customize the site for your organization's needs. Use a browser to return to your Moodle site and log in as admin. Once logged in, choose Configuration from the Administration menu on the left. This will allow you to make changes to many features and site design. For many more themes and design options visit the official Themes webpage. There are many good designs available.
I also recommend you spend some time traversing the various menus and options and testing things for your self. Get to know Moodle and enjoy!
I hope this introductory guide provides you with both the encouragement and confidence to utilize Moodle for your organization's needs. Moodle's relatively easy installation and use makes it a great educational tool.
TROUBLESHOOTING
PROBLEMS? WHO TO CALL?
I want to ask that you please do not bug people on the official Moodle forums or Moodle site with questions specific to THIS article. I or someone else at reallylinux will try to resolve questions you may have that are specific to this "un-official" guide. The fine folks at Moodle have plenty to do already! As always, please ask only after you've thoroughly read the documentation.
MYSQL/PHP ERROR
On rare occasion Fedora Linux will fail with its configurations. Before you begin to tinker with the database files or do some major editing of the PHP.ini file, try these initial steps:
From the main menu, choose Desktop, System Settings, then click on Security Level
Select the SELinux tab. Then uncheck the Enabled (Modification Requires Reboot) box and press OK. You must disable SELinux for this to work right. Note that you should reboot your server to update your settings.
Or, maybe you can try using our example php.ini file and see if this resolves your issue. Please reboot after you copy this file to your /etc folder.
ERROR: We could not connect to the database you specified...
This error is almost always a result of improperly configuring the paths and settings in your Installation Database window.
For instance, the default for the user is: moodleuser@localhost
However, this often fails for login and database purposes and needs to be changed to: moodleuser
ERROR: PHP has not been properly configured with the MySQL extension...
This error comes when your server was only configured to use one type of database such as LDAP and not MySQL. In some cases, Fedora versions come with LDAP as the ONLY default database module extension supported. This is easily resolved by using the following steps from a super-user terminal prompt:
nano /etc/php.ini
Now press the CTRL and W keys simultaneously to search on a keyword in the file. Search for this: extension=
You will see the string in the php.ini file that reads:
; extension=msql.so
Now edit this line by removing the semi-colon so the line reads:
extension=mysql.so
Notice the 'y' needs to be added.
Now save the updated php.ini file by pressing Ctrl and O and then pressing Ctrl and X.
If you have this issue you also need to copy the necessary mysql module file called mysql.so. You can download our example version or get an updated one on the web. Place this mysql.so file into your /var/lib/php/modules folder. For example, if you download our file into your root folder, you use this command:
cp /root/mysql.so /usr/lib/php/modules/mysql.so
You must now restart httpd and mysqld processes after making updates to modules and configuration files like this. You can restart the processes using the Service Configuration tool noted above in Step 4.
ERROR: Could not write the /config.php contents...
This error is almost always a result of a permissions problem. You may have forgotten before running the installation process to change the permissions for your website directory /html to allow read and write permissions. Please go back to Step 3. and review the details on folder permissions.
Mark Rais serves as senior editor for reallylinux.com and as a freelance writer. Rais promotes Open Source to organizations and government leadership in USA, Asia and Africa, and has written or co/authored five books, including Linux for the Rest of Us 2nd Edition.
Linux is a registered trademark of Linus Torvalds. IBM, PC-DOS, and OS/2 are the registered trademarks or trademarks of International Business Machines. Microsoft, Microsoft Vista, Microsoft Windows are all trademarks or registered trademarks of Microsoft Corporation both in the United States and Internationally. All other trademarks or registered trademarks in this opinion piece belong to their respective owners. FINAL RELEASE VERSION


