Basic Guide to Linux DSL Use
By Mark Rais, author of Linux For the Rest of Us, and senior editor of reallylinux.com
This
brief chapter should help beginning Linux users get a DSL connection up
and running. Keep in mind that I use a lot of graphics to help
guide beginning users. For a Linux book that's good, but for
someone with a dial-up internet connection it may be rather
slow!
You'll also notice that I refer to DSL and Cable modems several times in the chapter. Configuring DSL and Cable modems is very similar.
The following tips will hopefully help give a well rounded view into the necessary settings and configuration that apply to most newer flavors. Older flavors usually require you to install the PPPoE driver before configuration is possible. These drivers should be on your Linux flavor’s website.
You'll find that connectivity to your broadband service using almost all flavors of Linux is dependent on two things:
- What type of service you have purchased
- Correctly setting the IP and DNS configurations
The term “service provider” is different than “internet email” provider. In most cases your telephone or cable company run the service and other companies provide Windows software to run things like email, news, etc. For Linux, only your service provider is important.
This
excerpt doesn’t include info about using static IP addresses,
which usually comes with a premium broadband service.
Fedora/Gnome
DSL Configuration (for SuSe/KDE info click here)
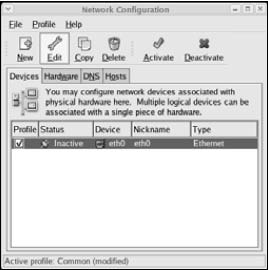
To start the broadband modem configuration and setup your DSL modem in Fedora Core 2, go to your Fedora main menu, choose System Settings, then Network.
This will start the Network Configuration tool.
Here you will ensure that:
- Your ethernet device is properly configured to allow automatically receiving an IP address;
- Your service provider’s information including your account id and password is setup — if needed.
On the Network Configuration screen, select your ethernet device (eth0) and press the Edit button.
You should now see the Ethernet Device screen.
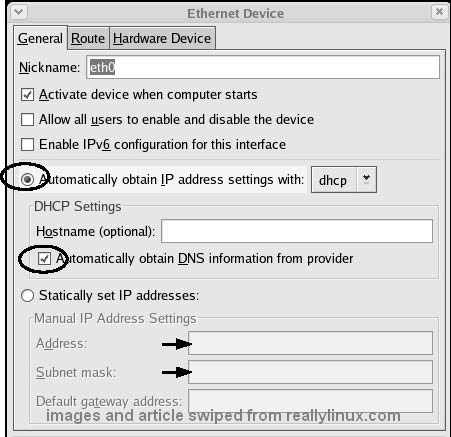
Make sure that you have cleared out all information under the Statically set IP addresses field, and then selected the radio (round) button labeled Automatically obtain IP address settings with dhcp and the check box to also automatically obtain DNS.
Now click OK to return to the Network Configuration window.
Now its time to activate your ethernet device. Select the device from the list and then click the Activate button.
By doing so, you will enable the device to retrieve the DSL or Cable service provider IP address for your connection automatically.
You should then see an information window appear similar to this:
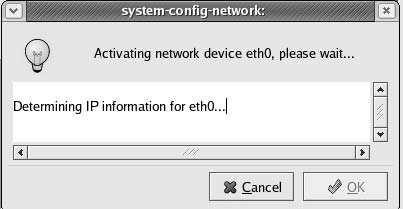
Once the system-config-network window disappears, you should be connected to the internet and enjoy surfing websites.
However, I always recommend at this point to reboot your Linux PC. This will ensure that all configuration changes are enabled. Once your Linux system is back up and you are able to use your desktop, you’re ready to enjoy broadband internet connectivity.
Open your Mozilla web browser and enjoy!!!
What if you don’t have an ethernet device listed?
This could be a serious problem with your ethernet card installation. Or, much more likely, it may simply mean that you need to manually install either an ethernet device or a DSL connection device.
Sometimes Fedora does not automatically recognize your ethernet card for internet use. In the rare event that your ethernet card was not available from the list, even after you have doubled checked that it is properly installed, try the following steps to get your Cable modem or DSL modem connection working.
There
are two options to follow, and for this web excerpt I've included the
more typical option.
Add a new broadband modem device to the list by following these steps:
From the Network Configuration window, press the New button. Usually, either your Cable or DSL modem configuration can be activated by simply creating an ethernet device configuration.
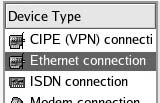
Choose Ethernet connection as the device type to create. Click Forward to continue.
Do not select the xDSL or other options.
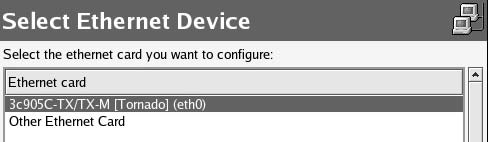
You will be given the chance to double check which physically present ethernet card you want to configure. Make sure the correct item is highlighted and press Forward again.
On the Configure Network Settings window be sure that the Automatically obtain IP address… button is selected. Also select the check box option to Automatically obtain DNS… as shown below.

You can now click Forward, check the summary of changes, and click the Apply button. You should see the Network Configuration window.
From here, select the new ethernet device and press the Activate button. A small window will appear and then disappear. Once the window is gone, you should be connected to your internet service provider and may begin using a web browser.
For those in need of SuSe KDE configuration tips, please click here.
(if you found this article helpful, you may also benefit from our other Linux guides.)