This article is for all of those readers asking for a very basic overview of networking Windows and Linux PCs. You will also benefit from my articles:
Setting Up a Full Powered SAMBA Server and
From Windows to Linux.
Can a Windows system and a Linux system talk together harmoniously? After all, there is a lot of work and personal data left on Windows PCs that many want to keep! So this question of networking the two systems is both reasonable and vital.
My response to the many beginners who inquire is that yes, indeed it can and should be done where ever necessary. Not only can Windows and Linux PCs talk, but for years now a very concerted effort by many outstanding software developers has resulted in the creation of a file sharing protocol and tools called SAMBA.
This exotic sounding name is simply a name derived from the original UNIX SMB file sharing protocol. If you want more details please click on this link to my Samba Server article.
But Samba is no longer simply a protocol. When used in the context of today's Linux flavors, you'll find that it includes a server (used to connect to other Windows or Linux PCs), a client, and even functions for workgroup and printer sharing. Most importantly, other PCs can connect to the Server via the Client and easily share files by simply dragging and dropping the files using a graphical interface.
Therefore, basic Windows file sharing can be done with relative ease if your Linux flavor includes the Samba tools. Of course, it also requires a little work on the Windows PC since any good communication comes from two sides!
The goal then, regardless which Linux flavor you're using, is to:
- Ensure that Samba tools are included and available
- Configure the PC network cards and settings
- Configure the Windows PC to allow workgroup sharing
- Configure Samba tools to recognize the Windows PC
I include details for each of these steps in the article. Implementing the steps above is somewhat unique across every major flavor I've used. Some flavors will require you to select Samba tools at the very beginning of the installation process. Other flavors include the full Samba suite of tools as part of the package, ready to go. It depends so much on your flavor that I can't provide specific guidance without writing another fifty pages on the subject. I plan to release an indepth SAMBA article here in the future.
However, what I can share with you now are steps needed to implement Samba using Fedora as a tutorial or guide. These steps are for making a basic WindowsXP Home Edition available to Linux.
My assumption is that before you begin, you've already familiarized yourself with the Post-Installation Configuration article, and that you have the two PCs connected properly with a network hub and cables.
1. Ensure that Samba tools are included and available
For most of us, the tools are preloaded and installed with the newest flavor of Linux Fedora Core 2 and greater. However, there may be a time when they did not get loaded. To check if Samba tools are loaded, in a terminal window, type the following command:
locate samba
You may also check to see that there is an existing Samba configuration file located under the /etc directory. Do so by using this command in a terminal window:
ls –alt /etc/samba/smb.conf
This will show the all important Samba configuration file, which you may need to review and edit in the future using a text editor.
Assuming that you have successfully found positive signs of Samba's existence, you can move on to the next step.
However, if nothing shows up when you ran the locate command, you will need to download and install Samba tools from the internet. One suggestion is to check your flavor's site for the latest Samba tools, or go to: www.samba.org
For the latest downloads review the list here and make sure to read the HOW-TO instructions first!
2. Configure the PC network cards and settings
Your next course of action is to identify whether your WindowsXP system is ready to talk to the Linux PC. Is the network connection active and are they on the same domain?
Checking this on your Linux PC is a very simply process. If you're not using Fedora, please read the Post-Installation Configuration chapter for the help in finding your network configuration tools.
With Fedora as the example, from the main menu, choose System Settings, then Network. Or simply type this command into a terminal:
system-config-network
Your Network Configuration tool will start. In the tool, you should see a fully operational eth0 network card device.

Now, click the Edit button to review the configuration for the eth0 network card to ensure that it is set up properly. What I include are samples from my own network. You may choose different network settings or try using exactly the same ones I provide below. The key is to remember that your Linux should not have different subnet mask information than your WindowsXP, or they won't communicate.
NOTICE: if you're in a business setting it is entirely likely that your DNS server HAS ALREADY ASSIGNED CORRECT IP information. The use of Static IPs is only provided to give an example. Leave the settings as "Auto obtain IP information" and be sure to select the "Automatically obtain DNS" checkbox in a dynamic setting.
Press OK when you've confirmed that you are using a Static IP address, and that the static IP and subnet mask work with what you plan to use on the WindowsXP (you'll soon see the way I configure my Windows PC).
Keep in mind that office PCs may be on their own IP naming scheme and have different mask and gateway information than shown!
Now select the eth0 device and click the Activate button. You will be prompted to save the changes. A small window will appear and should then disappear. As soon as it does, I recommend you reboot your Linux PC. This will ensure the changes take affect.
On the WindowsXP system, under the Start menu, choose Control Panel, then Network Connections. You should see a Local Area Network icon.
If you don't have any LAN connection icon under Network Connections, then you will need to run the new connection Wizard.
In the Windows wizard, choose Setup a home or small office network option. These wizard steps should properly configure your WindowsXP to use the network card.
Once you've finished you should see the Local Area Network icon.
Click your RIGHT mouse button over this icon and choose Properties. From here you need to select the Internet Protocol (TCP/IP) item. Once it's highlighted, you should press the Properties button.
Again, my simple screen shot should provide you with some general guidelines how to configure the individual items.
You must first select the Use the following IP address button.
It is not always necessary to create a DNS server IP. As I was
testing, I could get my PCs to talk with this setup.
Notice that the Linux PC was set to IP 10.2.2.2 and the Windows is set to 10.2.2.1 as a very rudimentary network configuration.
Now click OK to exit and save the IP configuration.
Once you're back on the Local Area Connection Properties window, choose the third tab labeled: Advanced. Under this tab you will see the firewall setting.
If your firewall setting is enabled, and you complete the steps, but your Linux PC still does not connect, you may need to disable it. I share this with you now since you will likely need to know where the firewall setting option is located in the future.
3. Configure the Windows PC to allow workgroup sharing
It's time to open up Windows Explorer (usually under the Start menu, then Accessories). In Windows Explorer you should highlight the disk drive of the WindowsXP system.
Once highlighted, click the right mouse button and choose from the menu: Properties.

You should see four tabs on the top of the new window. Click on the Sharing tab. This opens up your WindowsXP sharing attributes for the specific disk drive you've chosen. You should choose the two options:
- Share this drive on the network
- Allow network users to change my files (if this is desired)
Click the OK button to exit the drive properties window. Finally, your WindowsXP drive should now be available to the Linux PC.
4. Configure Samba tools to recognize the Windows PC
It's time to return to the Linux PC and make the connection. Thankfully, the Linux effort is a bit less intensive. From the Fedora main menu choose Network Servers.
If all is well, you should see a Windows Network icon appear. From the Network window, choose File, then Open Location (or press Ctrl and L). This will allow you to type a specific WindowsXP shared drive location. All Samba accessible shared drives begin with smb://
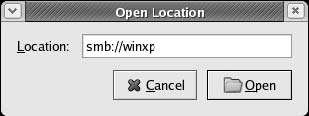
In my situation, I named my shared disk drive winxp
Pressing Open should reveal a new window with a Windows drive icon. By double clicking on the shared drive icon, I am now able to view the folders on my WindowsXP drive from Linux!
If all worked well you should now be able to transfer files to and from the Linux PC with a few simple mouse clicks.
To copy files from the WindowsXP PC to your Linux PC, try these steps. Note that I am simply conveying one method among many.
From the Fedora main menu, choose your Home icon on the desktop. This opens up a view of your Linux directory and files. Open the WindowsXP drive by choosing File, on the menu, then Open Location. As mentioned above, you need to type the proper Samba path. Now simply place the winxp shared disk window beside the Linux file system window, and copy files by drag-and-dropping the icons.
Troubleshooting Tips
If you're using Fedora Core 2+ and the steps above fail, you may try checking one of these common issues:
First, make sure that the permissions on the folder/directory you are sharing is set properly. You can change permissions using tips from this article.
Second, check to see that the smb daemon is running. You can do so with this simple command:
/sbin/chkconfig --list
You need to look for smb and then see 5:ON, which means that at run level 5 (normal boot up) your system automatically starts the smb daemon. If you've done all of the steps above and still nothing works, sometimes you need to restart/start the smb daemon manually. Try doing so with these two commands:
cd /etc/rc.d/init.d/
./smb start
Third, there is a great online book regarding Samba that I can recommend to folks who are more technically interested. Here is the book link. I recommend buying this book, among many from O'Reilly, that helps get going with SAMBA.
Troubleshooting for Non Fedora Users
Wait! Perhaps you're sitting there reading this detailed Samba configuration chapter while desperately trying to get SuSe, Mandriva, Debian, or some other Linux flavor using KDE to work properly with a Windows network. What solution do I give to the multitude of distinct flavor users?
I hate to leave hanging someone who is excited and interested. I wish I could lend everyone a hand in specifically describing their flavor's method of getting on to the Windows disk. However, I can't include that many examples and pages in this book (the editors are plucking and choosing pages to shorten the book even as I write!).
But for those desperate to get their own flavor working with the Samba, I offer a few tips below.
First: You must have all of the Samba components and programs installed. In many cases your flavor simply refuses to acknowledge the Windows network because it does not include critical files like sambawinbind. Your flavor's web site will have more details on this and other essential files.
Second: You must properly define the Samba location. Therefore, if you followed my previous examples, you may need to replace winxp with whatever you have decided to name your Windows shared drive.
Third: Be sure you have actually selected a Samba group name that is identical to your Windows network group name.
Fourth: Try opening a Konqueror window and insert into the Location field something similar to the following (replace winxp with group name of your windows pc): smb://winxp/
Mark Rais has written numerous articles on integrating Linux and Windows including his featured article Moving to Linux for Business. Besides serving as managing editor for reallylinux.com Rais also contributes as a technology consultant for educational and non-profit organizations.
Linux is a registered trademark of Linus Torvalds. Microsoft, Microsoft Windows, and WindowsXP Home Edition are trademarks or registered trademarks of Microsoft Corporation both in the United States and Internationally. All other trademarks or registered trademarks in this article belong to their respective owners.