Basic Guide to Dial-up Internet with Linux
by Mark Rais, senior editor reallylinux.com and author of Linux for the Rest of Us 2nd Edition.
Our other related articles: This beginner article summarizes Mark Rais' experiences using a dial-up internet connection with SuSe and Fedora.
It's intended as a review for the many people who are still using dial-up all around the world and need basic help getting started. In his desire to help everyone switch to Linux Mr. Rais did not want to leave out the dial-up crowd!
However you can also read his article Basic Guide to DSL/Cable Use if you are using broadband. Before you start, please note that some modem manufacturers rely on Windows to operate their modem hardware (aka WinModems), and therefore your internal modem may not work. If you experience trouble then hopefully this page and this web site may help resolve the issue for you. Those with non-Winmodems and external Hayes compatible modems don't need to worry about this at all. Step 1 Start by Connecting and Rebooting Once you have properly connected your modem and made sure it is on, reboot your Linux system. In all likelihood, your modem will be detected by the Linux hardware detection tool and automatically installed. Step 2 Get Details from Your ISP After successfully loading your desktop, you will need to configure your modem, which will require some information from your ISP. Most ISPs will accommodate you and provide clear answers to your questions, since you are paying them! However, some ISPs require you to use proprietary software to dial in and log on to their service. This may inhibit using the generic Linux tools and require you to use some form of emulator to run your ISP’s software under Linux. If you are stuck with such an ISP, you may want to consider an alternative FREE ISP who fully supports Linux. I’ll provide some tips later on the subject. In most cases you will simply need to know the local dial-up number to call your ISP. You should take the time now to contact them if you need to get this information. Here’s what you may want to communicate:
Basic Guide to DSL/Cable Use
Commands for
Beginning Server Administrators
Full list of our exclusive Linux articles
TIP: If your ISP tech person mentions that the ISP “does not support Linux,” acknowledge you understand this and repeat your questions, since you’re not asking them to help provide tech support for Linux, you’re asking them how they allow access to their network for your use.
You will find out shortly something I’ve noticed from my experiences — some ISPs are far nicer about helping you do this than others!
Once you have your ISP information, you can quickly configure the modem and enter details for accessing the ISP account. You will also need your account id and password, so have them handy as you begin.
As with other configuration examples, I will use actual steps from two of the major flavors (Fedora and SuSe). I’ve successfully used this information while installing other popular flavors too, so they will apply to most of the newer flavors. The tools are often determined by the Desktop you use and so Fedora (uses Gnome) and SuSe (uses KDE) help give a rather well rounded view of how to setup your modem across most flavors.
In Fedora you will find a handy menu item under System Tools labeled Internet Connection Wizard.
It’s actually the Internet Druid configuration tool and will simplify the process of identifying the modem and ISP details. Go ahead and start the tool by clicking on it.
You can also get to this tool later by typing in a terminal prompt: internet-druid
Please notice that once in the tool you actually have the option of adding a number of new devices. For now just click once on the Modem connection and press the Forward button.
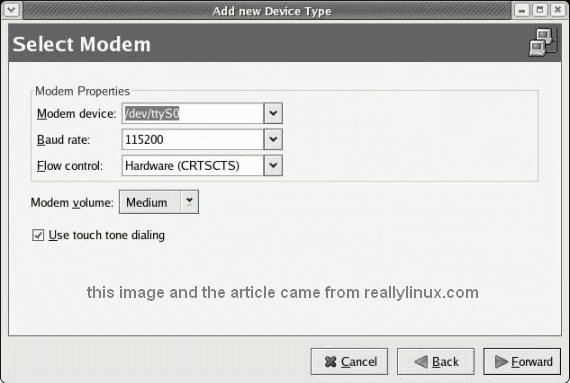
You will see the Select Modem screen. From here you should choose from the pull down top menu item the proper device for your modem. It may vary, but from my experience, in a majority of cases an external modem connected to the Serial port on the back of the PC will be /ttyS0.
I also recommend that you change the volume to ensure you can hear what the modem is doing. Set it to Medium and press Forward.
Now you will see the screen that offers the chance to input details regarding your ISP and account.
You will see a listing of preloaded ISPs on the left menu. If you reside in one of the countries where an ISP is listed, then you can choose the details from the menu, under the appropriate national flag. If you reside in other countries like the U.S. or Canada you will need to input the details.
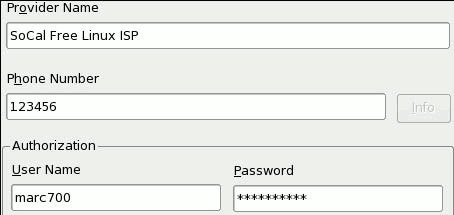
Be sure that what you put into the Phone Number items are applicable to your calling location. In most cases, you do not need to enter anything into either Prefix or Area Code. The Provider name field, as in a number of other configurations like Debian and Mandrake, is not essential and is there for your own reference.
Make sure you type in the correct login and password! When you’ve finished filling out the details, press the Forward button again.
The next screen refers to your DNS settings. In most cases you should make sure that it is set to automatically receive your IP address.Also, be sure to select automatically obtaining the DNS information!
You will now see the Network Configuration tool appear. In the future, you can access this tool again by either going to the main menu and selecting System Settings, then choosing the Network icon, or you can type into a terminal window the following:
system_config_network
Below is my screenshot of the Network Configuration tool:
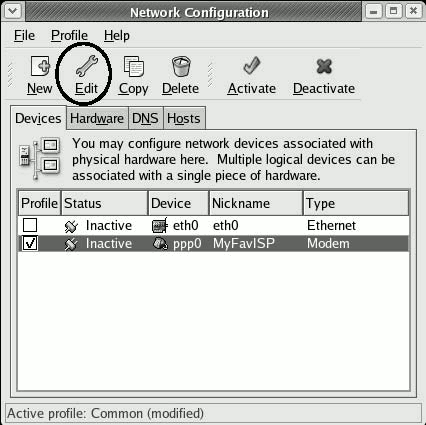
By highlighting your Modem and then clicking on the Edit icon, you will be able to make changes to the configuration details. Most of the Modem configuration should already be completed and correct.
Click on each of the tabs (Router, Provider, etc.) and check. If everything looks like it matches your input then go to the Advanced tab and select the option to Let PPP do all authentication.
This allows the PPP (point to point protocol) to handle passing your login and account data to your ISP, which is the default for most situations. Press OK and return to the Network Configuration main window.
You can close your configuration window, which will give you the option to Save your changes. Click OK to save the changes you made.
Now, please reboot your Linux system. Rebooting has often resolved issues with hardware configuration and so I strongly recommend it after any new modem or network setup.
Once your Linux system is back up and running, you should be able to dialup your ISP and get online! Go to the main menu, choose System Set- tings, then Network to return to the Network Configuration tool.
Highlight your modem device, and then click on the Activate button.
You should see a small window appear with the words:
Activating network device… please wait.
When this window disappears you are ready to surf the internet. Open your Linux web browser and enjoy!
To end the dial-up session, return to Network Configuration tool, highlight the modem, and click the Deactivate button. That's it, hopefully now you can enjoy Linux with Dial-up!
NOTE: Troubleshooting and helpful TIPS are included at the end of this article.
If you use SuSe or some other flavor running the latest KDE desktop these tips will help you get online with a dial-up modem.
Remember that even though the screens may not exactly match your own (all flavors differ somewhat), the tips and information I provide, such as automatically setting DNS, will apply to all flavors.
Begin by starting up the YaST tool, or your flavor’s hardware configuration tool. If you’re not sure what I am referring to, please review the article Post-Installation Configuration for guidance.
To start SuSe’s YaST tool from your main menu choose System and then YaST. If it’s not listed there, then from your main menu choose System, then Configuration, and click on the YaST icon.
From the YaST main menu choose Network Devices, and click on the Modem icon.
The Modem configuration window will open and offer you the chance to either configure an existing modem or add a modem. In many cases SuSe hardware detection has already identified and configured your modem for you. You would see it listed under Available are:
However, for those who don’t see a modem listed or who get a modem listed that does not match the one installed, I include details on adding your modem below.
ADDING A MODEM TO SUSE:
To add a modem press the Change button, not the Configure button.
You will see a window that offers the option to Add your new modem and also Add ISP related information.
First begin by clicking on the upper Add button, which will allow you to configure your dialup modem.
Once you click Add you should see the Modem Parameters window.
The device name is very important. Sometimes the device is already preset to something like /dev/modem.
In many cases this is not correct and will not work. Instead, click on the pull down menu and select /ttyS0, which is usually the correct device name for a modem connected by a serial cable to the back of the Linux PC.
On the Modem Parameters window, you should also make sure that the Speaker on setting is selected and that any dialing prefix you need to dial out (such as 9 for dial out) is entered in the Dial prefix.
Click on the Next button to open the Select ISP window.
Here you will find a very thorough listing of many available ISPs. You will find a rather thorough list and if one of the ISPs is yours, you can simply select it and press Next.
However, for those folks who did not find their ISP listed, there is a very simple solution. Press the New button to configure it manually. Don’t worry, this is a quick process.
You will see the Provider parameters screen.
As I mentioned, almost all flavors I’ve used across the board included a “Provider Name” field. This is used exclusively for your information and is not essential to the login process. However, the phone number field must be correct! Once you finish filling out the information on this screen press Next one more time.
On the Connection Parameters screen you will find an important setting! The Modify DNS when connected option is actually allowing your ISP to set your Linux DNS and in almost every case you must select this.
Please make sure the options in the example below are set on your configuration screen as well. I’ve circled them for easy reference.
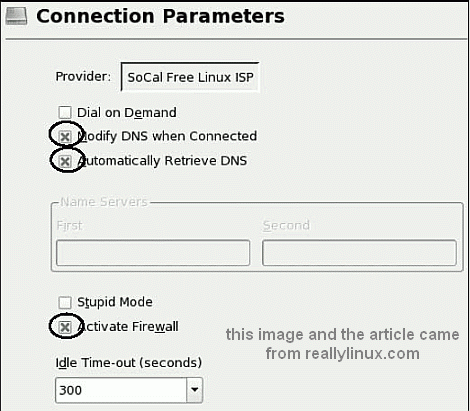
Selecting Firewall is another important option and will basically disable inbound connection requests. You should almost always have firewall selected. Only in cases when I’m using the Linux system as a server does the firewall sometimes impede rightful inbound requests.
Click Next and you will return to the Provider Parameters screen where all fields should now be filled in. You are ready to start your first Linux dial-up session as soon as you click Next and then the Finish button!
If you see the option to Configure Mail Now? select No. You can always do this later.
As I already mentioned earlier, rebooting can prevent many frustrating experiences with hardware configuration. I strongly recommend a reboot after any new modem or network setup. Once your Linux system has rebooted, look for the KDE Internet Tool located on the bottom right of your KDE menu. It looks like this: ![]()
You can press the right mouse button over the icon to view all of the tool’s options or to manually dial-in. Otherwise, you simply click one time on the icon to begin dialing.
Once your dial-in is completed, you’re ready to browse the internet! Open your Linux web browser and enjoy.
To end your dial-up connection click once more on the little KDE Internet Tool icon: ![]()
Sadly, a few ISPs are just not polite when it comes to helping you figure out the information needed to access them via Linux.
For this reason I strongly recommend that you run a web search (use your favorite search engine; I prefer using Google), and search on these words: free linux ISP
Depending on where you live, you will be surprised to know that there are ISPs in most major cities that fully support Linux users, and offer their service to Linux users for FREE! I used one in my local area to perform all of my dial-up modem testing. It worked great.
No, a free ISP will never be ultra fast, nor can it offer you the amazing selection others provide for monthly fees. However, the difference is that you can get online and start using Linux dial-up TODAY instead of waiting on the phone for a long time trying to get your current ISP to provide details how you can login via Linux. In fact, some ISPs don’t allow it at all!
Remember that hardware is usually the reason a dial-up connection fails.
Some solutions to common problems include: