Most HOWTOs seem to assume that after installation all works well and that you no longer need help configuring anything! Well, sometimes it just isn’t so. Yet, we will be the first to admit that to-day’s flavors do install very smoothly for the most part.
However, when they do not, the solutions are usually a few clicks away using your configuration tools.
The goal of this article is to guide you to your tools so that you are empowered to make configuration changes whenever you need.
We use Fedora, Mandrake (Mandriva), and SuSe as examples below. Hopefully some of these examples will help to guide you to the necessary tools. Please note that there are a LOT OF IMAGES in this article that may be slow for those using dial-up. Sorry, but hopefully the images help clarify the steps far better!
1. Network Configuration
SuSe Network Configuration (Fedora and Mandrake are further below)
You’ll be happy to know that all network, hardware, and software configuration under SuSe is done through a tool called YaST.
It’s easily found under your main menu by selecting System, then selecting Configuration, and YaST.
From the YaST tool you need to select Network Devices and then click on Network Card. This will open up a configuration module that allows you to configure your Linux system’s network IP and host information.
Notice that if you already have a configured network card you will need to click on the Change button instead of the Configure button.
If you’re Changing a network card configuration (usually the case) then you should click the Edit button. In most cases your network card was already detected by SuSe and is listed.
Under the Network address setup you will find the option to select a static IP address, ensure that the subnet mask is correct for your network, and also change the Host name and DNS server details.
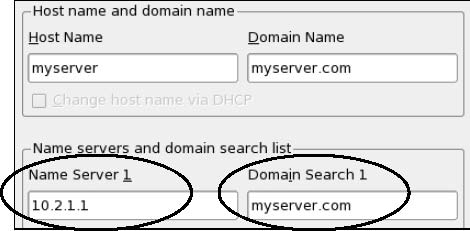
Click on the Host name and name server button. Now you can fill in details regarding your network routing. Be sure to use a fully qualified hostname and domain name. Also notice that I entered my Linux server’s IP and domain name in to the DNS fields as well. NOTICE: for intranets and situations where you do not have a static IP, then you must ensure that the Change host name via DHCP box is selected and other fields are empty!
Pressing Finish will complete and save your new network settings.
Fedora Network Config
If you’re using Fedora, you simply need to traverse the main menu to find System Settings. Under this menu item you will need to select Network to begin the network configuration tool.
Another way to start this tool is to type the following command into a terminal window:
system-config-network
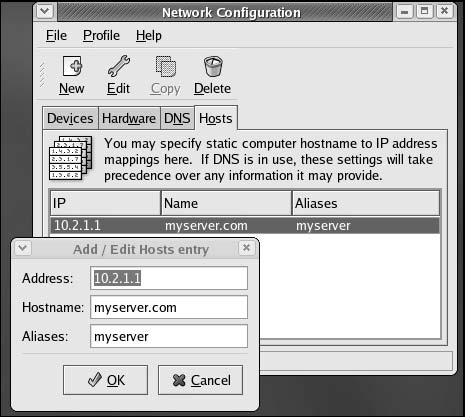
In this tool you can change your network card settings, add network hardware, or make changes to your host information.
Click on the DNS and Hosts tabs to make changes to your hostname and the IP address information. The image shows an example of a properly configured and working Linux server.
Mandrake Network Config
Mandrake users will likewise find their hardware configuration tool under the System icon from the main menu. You would select System, then Configuration, then Configure your computer.
From here you will see the main Mandrake Control Center. You should become well versed with all of the features here since it offers almost all of the core configuration tools you need.
To change your network configuration you will need to select the item Network & Internet. Under this menu you will need to find and choose the option New connection, which allows you to create any form of new Network type.
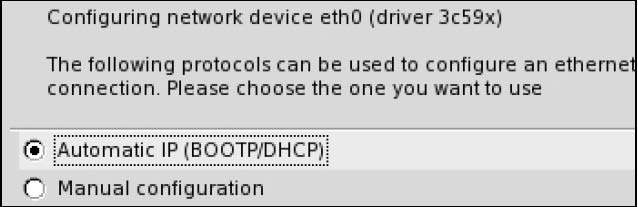
If you choose LAN you will find the settings to choose whether it is using DHCP or manually enter the IP address. Usually you can leave the setting on DHCP.
TIP: Sometimes using the menu to do something may take longer than simply typing the command in the konsole. To quickly open the Control Center, type this command: drakconf
SuSe Hardware Config
As mentioned earlier, SuSe has made configuration very easy by placing all of the configuration modules under one single tool named YaST.
The fastest way to start the YaST configuration tool and change hardware settings is by typing the following into a konsole or at a terminal prompt:
kdesu /sbin/yast2
Another way to get access to the YaST tool and change your hardware settings is by simply going to the main menu, selecting System, then Configuration, then choosing YaST. This will give you a nice thorough listing of all of the configuration modules available.
By selecting Hardware you see a list of modules to choose from. Most of these allow you to directly change configuration settings. For example, clicking on the Printer icon brings up a configuration tool to add a printer to your system.
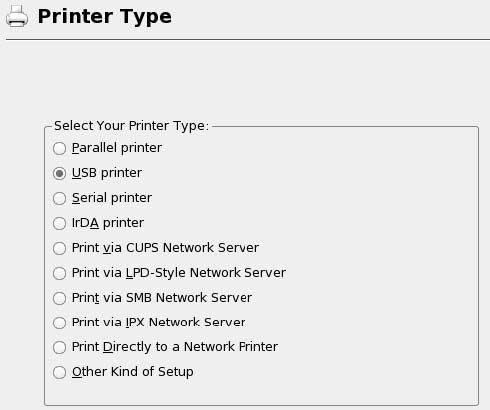
There are an amazing number of easily configurable options!
Desktop ConfigurationThe means to change desktop and environment details are included in depth in the next section Desktop Interfaces. There you will find the details to change not only menu items but the design themes for your entire Linux experience.
SuSe’s YaST also comes with a number of other unique and very helpful options that you may need when trying to address configuration issues.
One very fast way to fix hardware problems is to use the SuSe Plugger module that is almost always found on your Desktop menu.

You can also get to it using the command: suseplugger
This is an extremely straightforward and fast way to check existing hardware and to correct problems with drivers or configuration. Another unique and helpful feature is the YaST module that allows you to install drivers from your hardware manufacturer. Look under your YaST main menu for Misc. Select it and you will see an option to Load Vendor Driver from the CD. This will become more and more useful as hardware vendors include Linux driver databases on CDs they ship.
Fedora Hardware Config
You need to be logged in as root or have full rights access to use most of the Fedora configuration tools.
Most of the individual configuration tools for your different hardware are located under System Settings from the main menu. For example, selecting Display will start the display configuration. Some of the tools also offer helpful wizards that walk you step-by-step through the configuration such as the Printing tool, while some others do nothing but present information such as the Soundcard tool.
For those who prefer to use shortcut commands rather than use the menu and icons to select configuration, below is a brief list of configuration tools. To use any of these simply type the command into a terminal:
- system-config-display
- system-config-keyboard
- system-config-printer
- system-config-users
If your hardware was not properly detected, try restarting the system. The latest Fedora core includes many updated drivers that are initiated at bootup.
Mandrake Hardware Config
Configuring most of the other hardware can also be done using the Mandrake Control Center with the drakconf tool. For more refined or rudimentary Mandrake hardware configurations you can also use the tool called: harddrake2.
You access the harddrake2 hardware configuration under the System icon from the main menu. You will see the Configuration option, then select Hardware and Hard Drake, or you may choose Configure your computer and choose Hardware twice.
Remember if you’re not already logged in as root to enter your root password. These configuration changes are only accessible to root.
You will see a listing of most of your hardware. Select an item you are interested in configuring from the list.
Now you will see one or two buttons appear at the base of the window. Choose the button Run config tool. This will apply to almost all of the hardware components. From this point on you will need to choose a driver, specify details about your hardware, or run the troubleshooting tool if it is available.
In a number of cases, especially with modems, the installation can not configure the modem because it requires a proprietary driver. In this case the listing will show the error and where you can get more help.

Hopefully this brief review helped you identify the tools available for configuration and how best to access them whenever you desire.